Tutorial - How to Clone a Voice using Pixbim Voice Clone AI
Pixbim Voice Clone AI is an innovative voice cloning software that allows you to imitate voices, copy voices, and create voice impersonations and replications using artificial intelligence. This powerful voice replication AI can clone any voice with just one sample audio of short duration.
Contents -
-
Simple tutorial - How to Use Pixbim Voice Clone AI?
-
How to add more languages - Multi-language add-ons
-
Advanced tutorial - Multi speech
- How to run on large text files - organize your input text for the Best Voice Cloning results?
How to Use Pixbim Voice Clone AI?
With Pixbim Voice Clone AI, you can easily replicate and imitate voices to create custom voiceovers, narrations, and dialogues. Whether you want to create voice impersonations or professional voice cloning for your projects, Pixbim voice clone software makes it simple. If you are looking for the best voice cloning software out there, you can test Pixbim and see the results.
In this tutorial, we will walk through on "how to use Pixbim Voice Clone AI", A step-by-step tutorial to imitate voices.
Step 1: Download Pixbim Voice Clone AI.
Start downloading and installing Pixbim Voice Clone AI on your computer or laptop.
Download Free Pixbim Voice Clone AI
NOTE - If the software does not start up or is stuck while loading, then close the software. Right-click on 'Pixbim Voice Clone AI' icon on Desktop and select 'Run as administrator'. The software will start without issues.
Step 2: Load an audio file
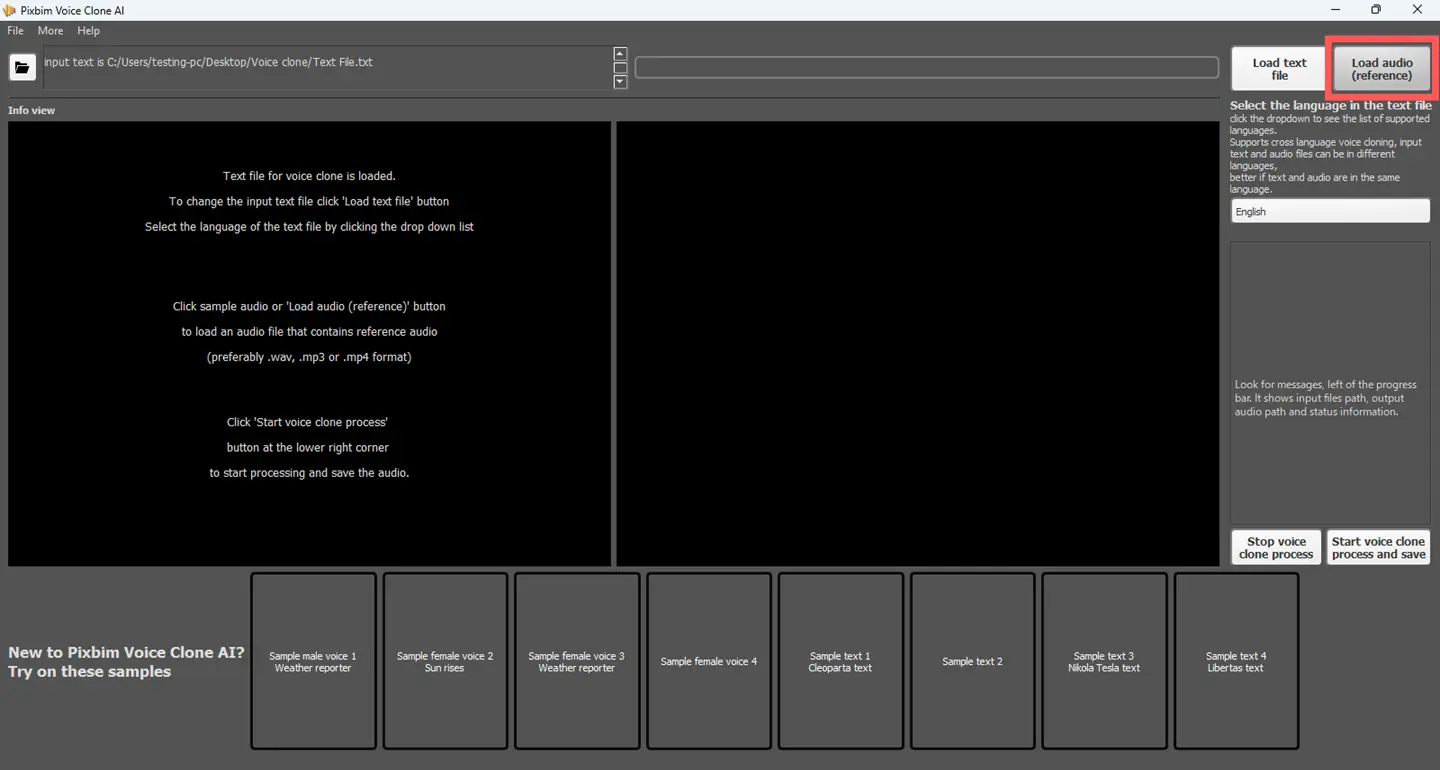
The first step is to load an audio file as shown in the above screenshot, containing the voice you want to clone. Accepted file formats include mp3 and wav. For best results, load a clear voice audio file with minimal background noise. This will allow the voice cloning software to accurately analyze the vocal tones and patterns required to replicate the voice.
Step 3: Load a text file for voice cloning
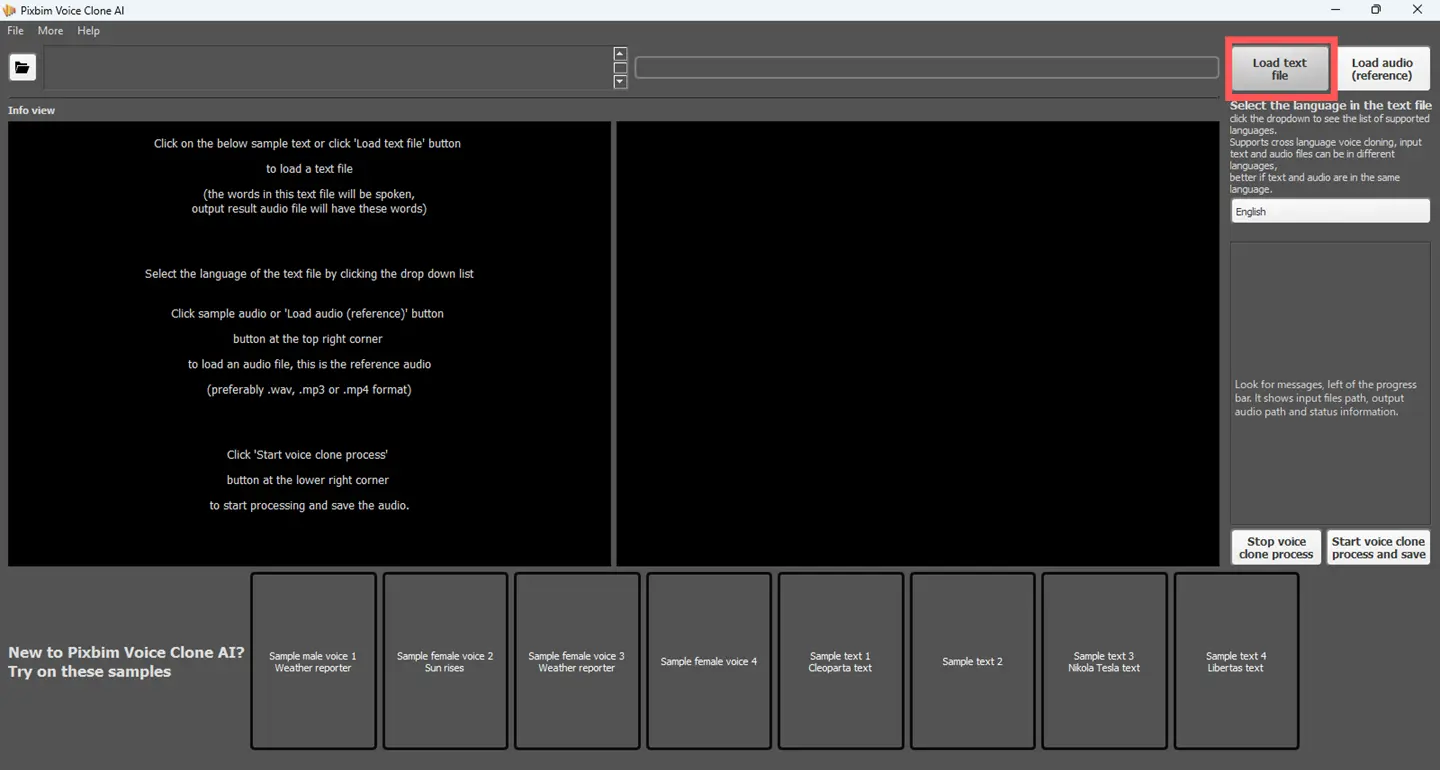
After loading the audio sample, load the text file, you want the cloned voice to speak. This can be a sentence, paragraph, or entire script (text). No matter what you enter, our voice clone software is capable of cloning it for you.
The more text you enter, the better the voice cloning AI will become at replicating the intricacies of the original voice. But if you have a very big text file, like several pages then break it down into several text files and load it.
Step 4: Select the language
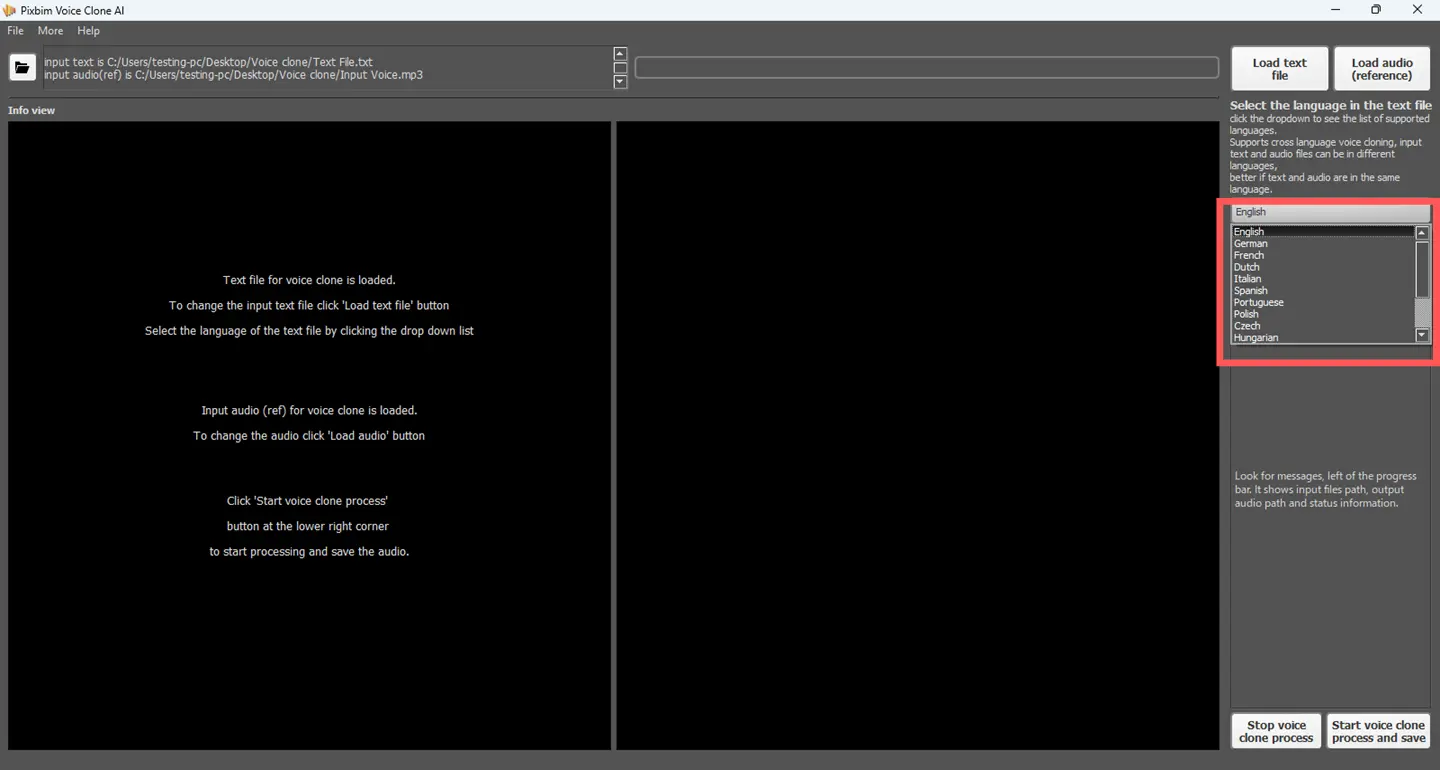
Next, select the language of the text file you loaded. Pixbim Voice Clone AI has advanced text-to-speech and speech cloning capabilities for languages including English, German, French, Dutch and more.
Choosing the correct language ensures accurate pronunciation and natural vocal output of our voice replication AI tool.
Step 5: Start voice cloning process
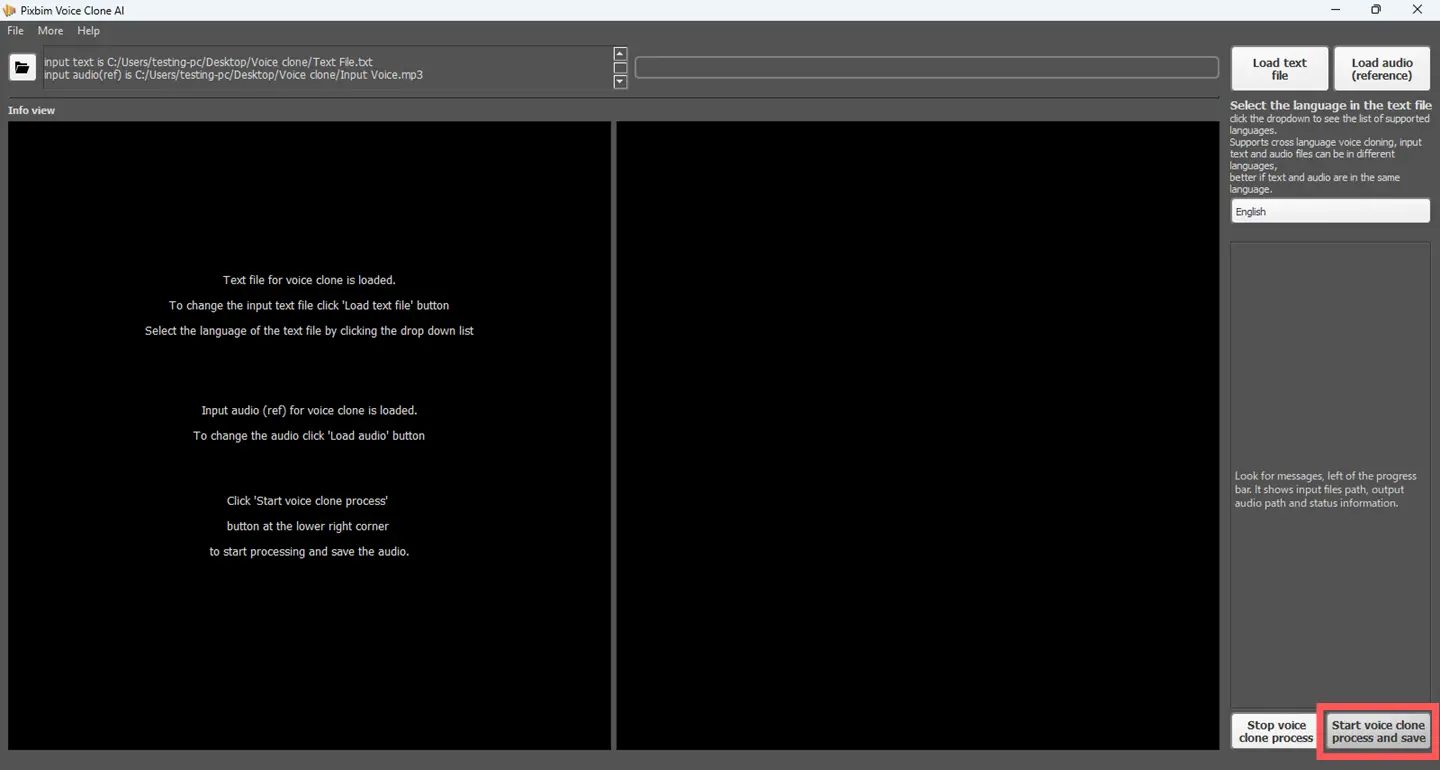
Click the ‘Start voice clone process and save’ button to start the processing and Pixbim's powerful AI Voice cloning application does the work. Using machine learning and speech analysis algorithms, the platform accurately replicates vocal tone, pitch, pacing, pronunciation, and other speech patterns.
Within minutes, your cloned voice result file will be saved!
Step 6: Access the cloned voice result
![]()
The last step is to access the output audio file and listen to your newly created voice clone. The file is generated as an MP3 file that can be easily shared or integrated with digital projects.
How to add more languages - Multi language
Need more languages?
Supports languages German, French, Italian, Portuguese, Spanish, Norwegian, Finnish, Polish, Greek, Arabic, Japanese, Hungarian, Russian, Hindi, Turkish, Thai, Vietnamese.
Download and install more language AI models from this link AI models for other languages
Multi Speech Voice Cloning
The final multi-speech audio output will be of several people having a discussion.
Inputs needed - Several audio files of people, one text file to create a single output voice cloned result.
How to use Multi-Speech?
To perform Multi-Speech Voice Cloning using Pixbim Voice Clone AI, you need the following files:
1. A script file (also called an input text file) that contains the dialogue assigned to each speaker – one file.
2. Audio files of the voices you want to clone (one for each speaker) - several files.
3. A ‘configuration file’ that contains the path to audio files and the path to the script file (input text file), this config file guides the software for voice cloning.
This config file allows Pixbim Voice Clone AI to read the script (text file), match each line with the correct speaker, and generate a realistic voice-cloned conversation accordingly.
Steps on how to create a script file (text file), config file for Multi-Speech to run -
Step 1: Create a script file (text file) and save it .txt format
Assume you have a text or script where three speakers are speaking with each other. For each line of dialogue, mention the name of the character assigned to speak that line.
For example, if there are three speakers: adam, stella, and matthew, here is how you need to format it.
Note: To reduce errors, please name the speakers in lowercase.
[adam] Hey Stella, did you manage to finish that project we were working on?
[stella] Hey Adam! Almost there. Just tweaking a few things before I call it done.
[matthew] Need a hand with anything? I’m free for a bit if you want some help.
[stella] Thanks, Matthew! I think I’m okay for now, but it would be great if you could review it when I’m finished.
[adam] Yeah, same here. Two pairs of eyes would definitely help catch any mistakes.
[stella] Awesome, I’ll send it over once I’m done. Appreciate you both!
[matthew] No problem! Looking forward to seeing the final version.
[adam] Me too. Let us know if you get stuck or want to brainstorm.
[stella] Will do! Thanks again, guys.
Step 2: Create a configuration file (config file).
Create a config file and save it in .txt format. (You can name the config filename as you wish.) A configuration file tells the Pixbim Voice Clone AI software where to find the script (text file) and voice files on your system.
The configuration file (config file) is important. What to specify in this config file?
Here is the typical config file for three speakers:
#Script file or input text file with full path
ref_file = "C:\\Users\\aipho\\Downloads\\multispeech\\myscript.txt"
remove_silence = true
#Mainspeaker adam configuration
ref_audio = "C:\\Users\\aipho\\Downloads\\multispeech\\adam.mp3"
# Speaker 2 stella configuration
[voices.stella]
ref_audio = "C:\\Users\\aipho\\Downloads\\multispeech\\stella.mp3"
# Speaker 3 matthew configuration
[voices.matthew]
ref_audio = "C:\\Users\\aipho\\Downloads\\multispeech\\matthew.mp3"
Let us explain each line of the config file -
First line should be the path to the script file (text file) :
ref_file = "C:\\Users\\aipho\\Downloads\\multispeech\\myscript.txt"
The above line in config file defines the path of the script file (input text file) and where to find it.
#This is comment (if a line starts with # in the config file then it is ignored, it is used for comments so it is easy for the user to read the config file)
Add the below line as it is with no change.
remove_silence = true
Now configure speakers or voices present in the script file. Suppose you have three speakers: adam, stella, and matthew. One speaker should be defined as the main speaker—let’s choose adam.
#Mainspeaker adam configuration
ref_audio = "C:\\Users\\aipho\\Downloads\\multispeech\\adam.mp3"
Let’s assume you have saved the sample voice files and script files in a folder called 'multispeech' inside the Downloads section of your 'C' drive. You need to provide the full path to this folder in the configuration file. (Tip: You can copy the path directly by clicking the folder’s address bar.) Copy and paste it.
Format on how speakers need to be configured so it is linked to the text file dialogues:
#Mainspeaker adam
ref_audio = "C:\\Users\\aipho\\Downloads\\multispeech\\adam.mp3"
# Speaker 2 stella (this is comment as it starts with #)
[voices.stella]
NOTICE THE ABOVE LINE., THIS LINE IS IMPORTANT. THE NAME [stella] should be used in the text file to define the text that stella speaks. [stella] links the audio file to the text content that stella should speak.
ref_audio = "C:\\Users\\aipho\\Downloads\\multispeech\\stella.mp3"
BELOW ARE OTHER VOICE FILES such as [matthew]
[voices.matthew]
ref_audio = "C:\\Users\\aipho\\Downloads\\multispeech\\matthew.mp3"
You can add any number of speakers in the above-specified format. For instance, if you have a fourth speaker ‘candy’ that you want to add in to the configuration file
#Speaker 4 candy
[voices.candy]
ref_audio = "C:\\Users\\aipho\\Downloads\\multispeech\\candy.mp3"
Important Notes:
Please name the files in lowercase to minimize errors, as using universal lowercase naming helps reduce potential issues. Don’t use spaces.
1. Create a dedicated folder where Pixbim Voice Clone AI can fetch all the necessities, such as the input text file (script file), audio files, and configuration file.
2. Naming the files: You can name your script file (input text file), audio files, and configuration file as per your preference.
3. Always use double backslashes (\\) in the file paths; you have to add these backslashes manually.
Example - C:\\Users\\aipho\\Downloads\\multispeech\\adam.mp3
NOTE – If the path is not in the above format, it will fail to read the audio file; replace a single slash with a double backslash as above.
4. Enclose all file paths in double quotes.
Example : "C:\\Users\\aipho\\Downloads\\multispeech\\adam.mp3"
5. Please configure the input text file (script file) in the first line of the config file, and then configure all the speakers (audio files). Remember, one of the speakers needs to be set as the main speaker, and the others as secondary speakers.
6. Ensure voice file names match exactly with the names defined in the configuration (e.g., adam, stella, matthew).
7. To reduce errors, please name all audio files in lowercase. Kindly save the input audio (Speakers) in mp3 or wav format.
8. Ensure all the speakers are defined.
Example - [voices. Stella]
ref_audio = "C:\\Users\\aipho\\Downloads\\multispeech\\stella.mp3"
Generating multi-speech voice cloning is highly effective if done properly. You can create infinite conversations between speakers, regardless of the number of participants.
Tutorial - How to generate multi-speech voice cloning output using Pixbim Voice Clone AI?
Here is the step-by-step Tutorial to Generate ‘Multi Speech’ Voice Cloning Output using Pixbim Voice Clone AI using text file and a config file.
Step 1: Download and Install Pixbim Voice Clone AI
Go to the Pixbim website and navigate to the ‘Quick Help and Downloads’ section. Download Pixbim Voice Clone AI Version 2.0 (New Version). Look for the section titled ‘Download Pixbim Voice Clone AI – Software for cloning voice from audio’. Once downloaded, proceed to install the software on your system.
Step 2: Select the ‘Advanced – Multi-Speech’ Option
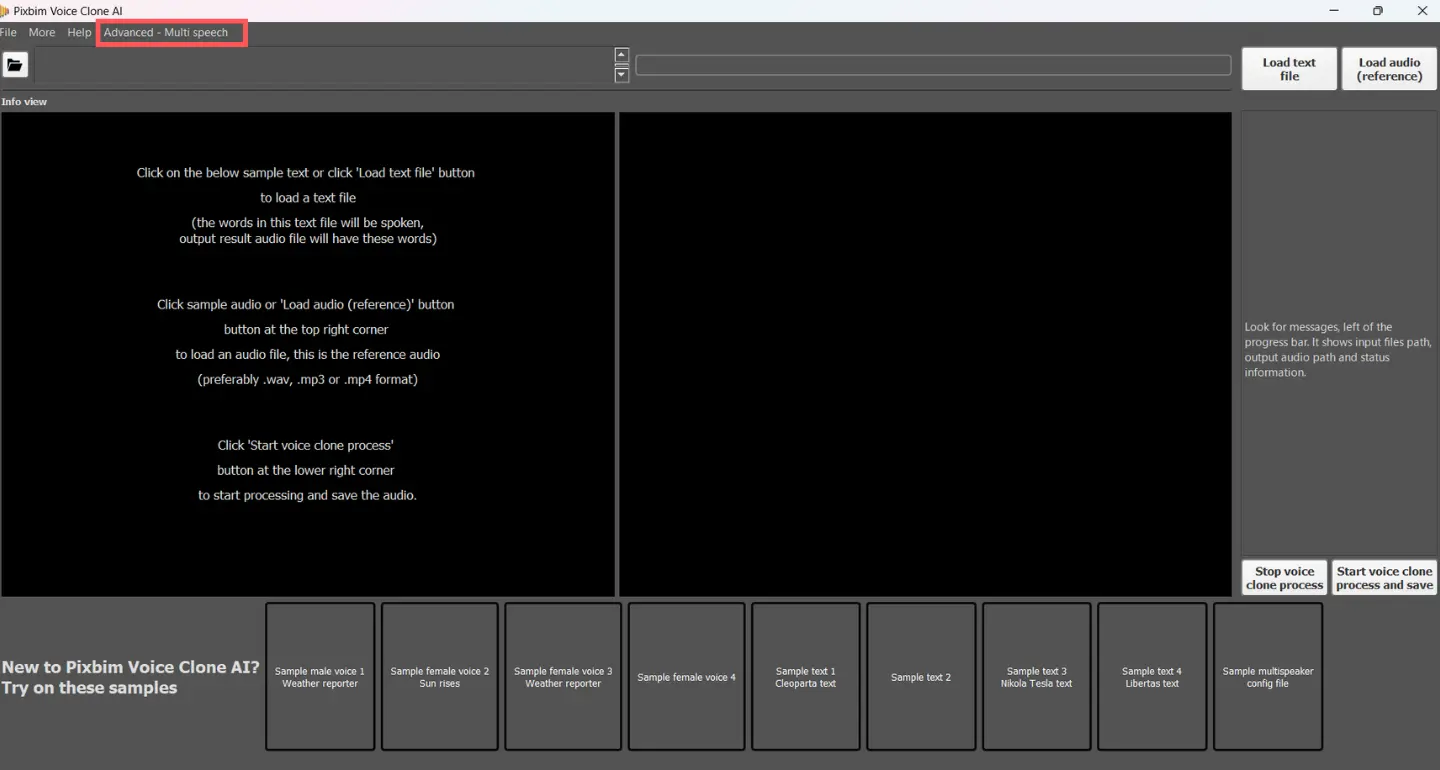
Open the software, go to the top toolbar, and click on the ‘Advanced – Multi-Speech’ section to activate the multi-speaker voice cloning mode.
Step 3: Load the Configuration File
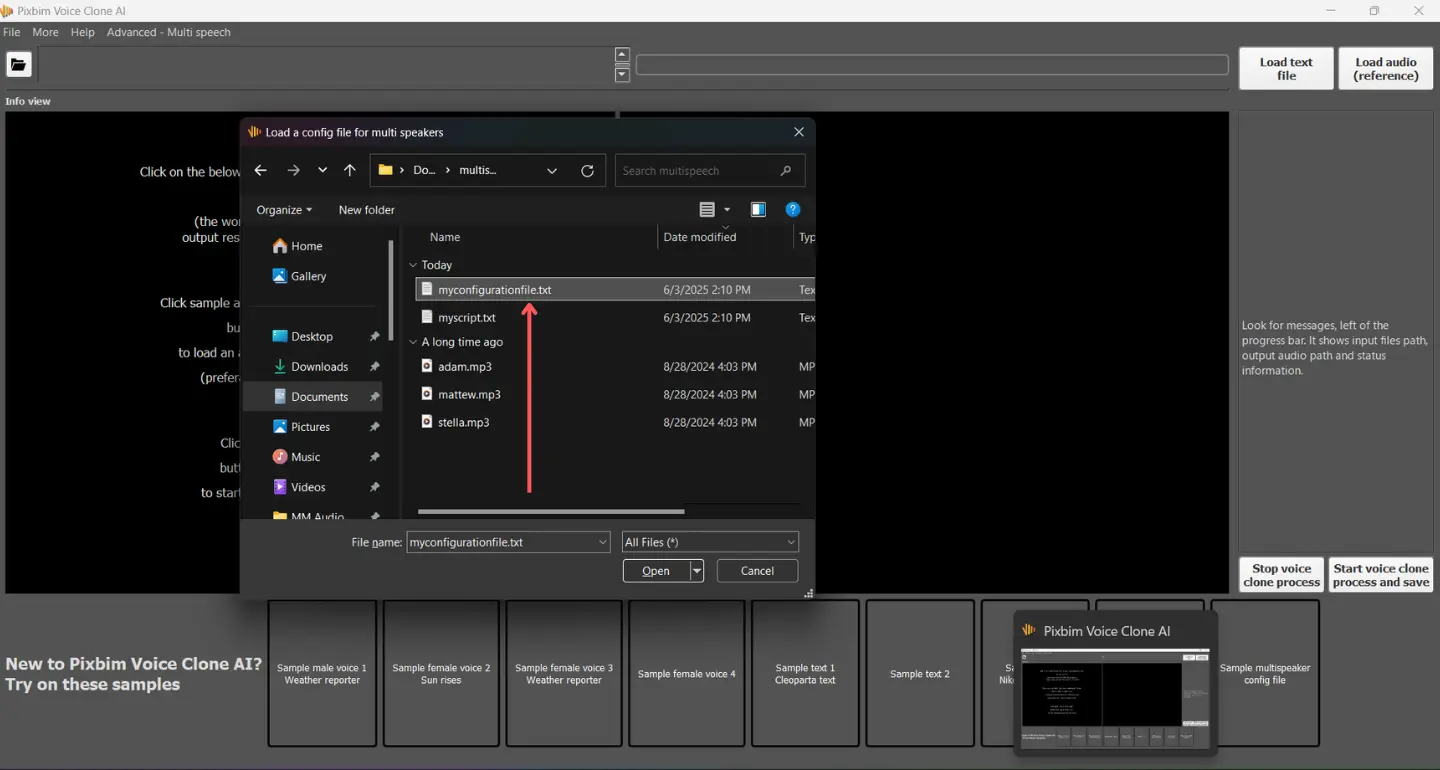
Click on ‘Load Config File’ and select the configuration file which is stored on your desktop/Laptop.
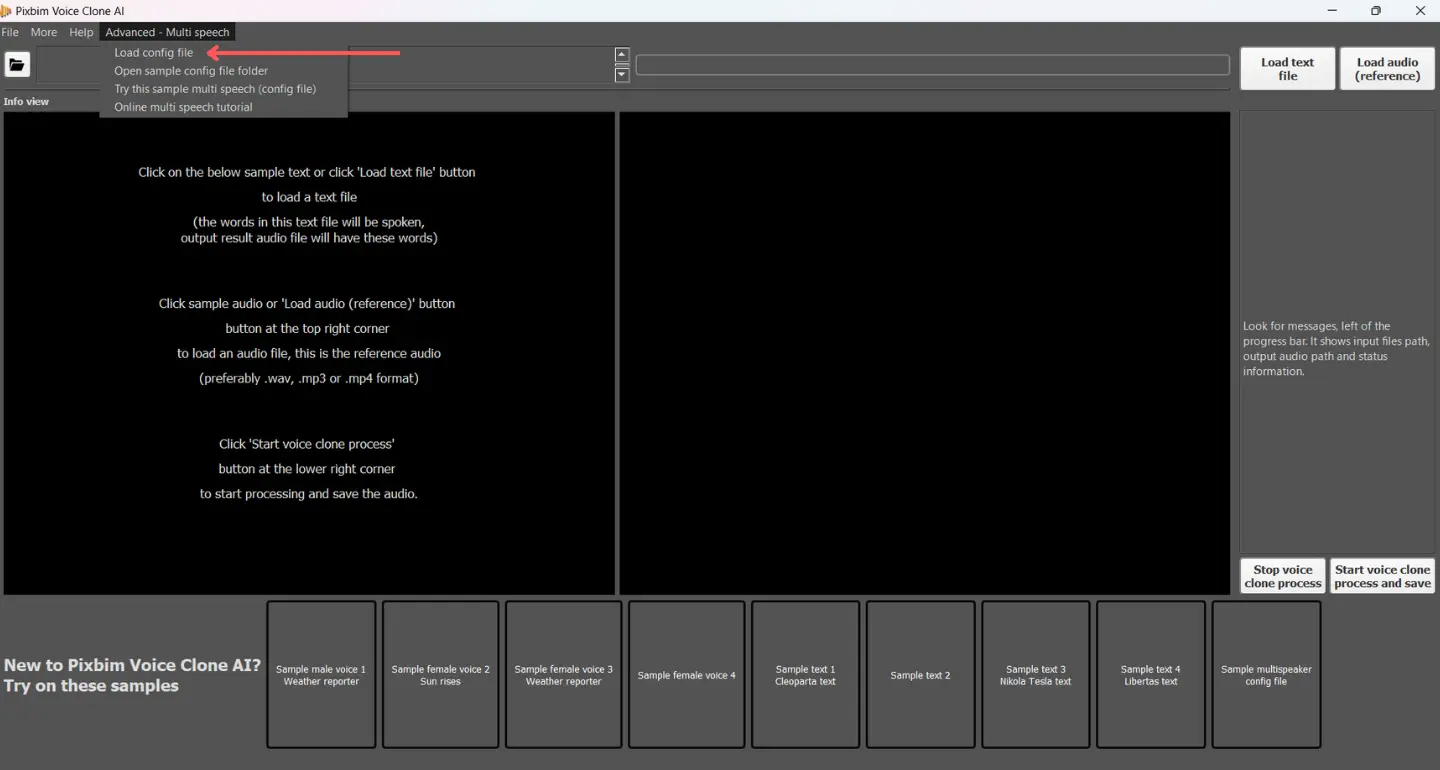
Browse to the folder where your configuration file is saved and select it.
A dialog box will appear, allowing you to choose a location to save the multi-speech voice cloned output.
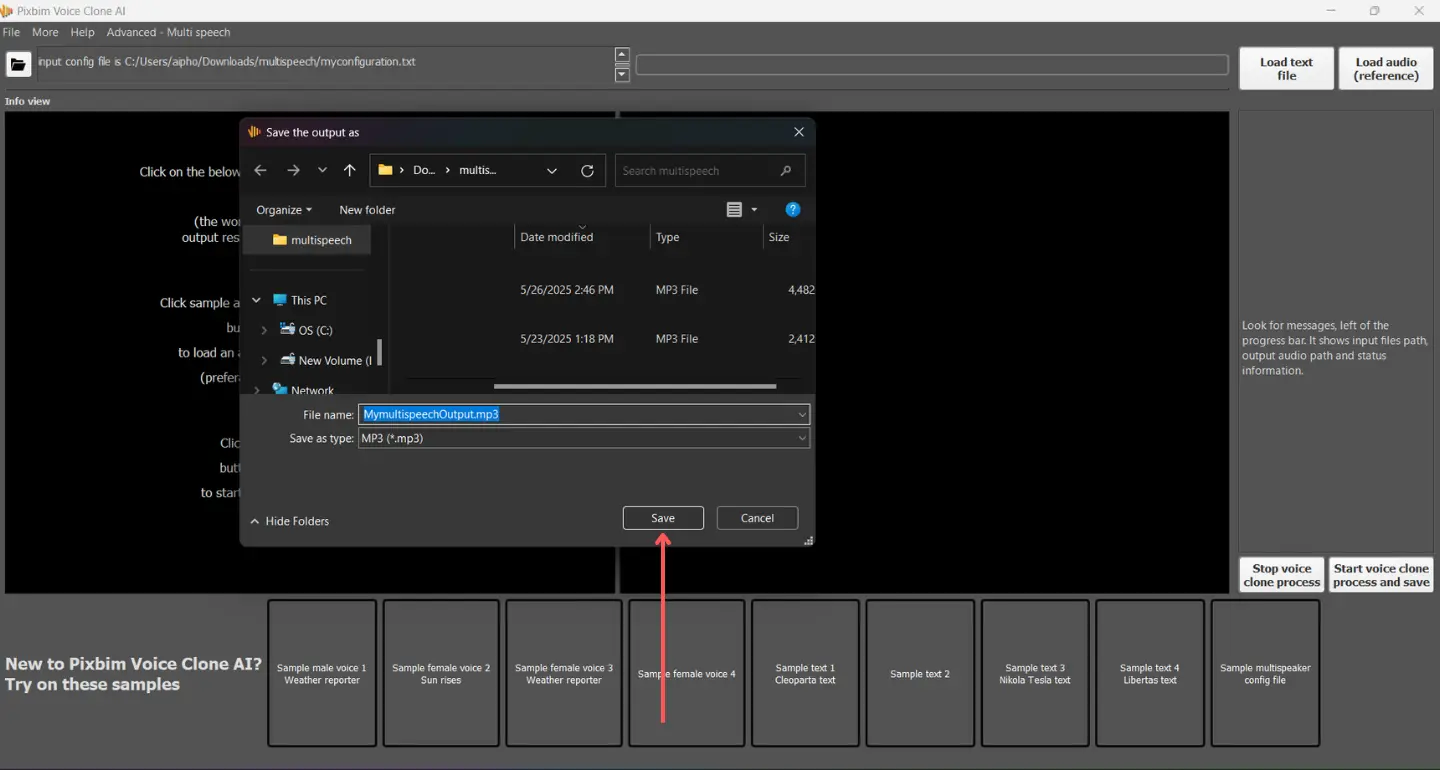
It is recommended to save the output in the same folder that contains your audio files, script file, and configuration file for easy access and organization.
Once loaded, the software will begin processing. You will see a progress bar indicating that each scripted line, assigned to a speaker, is being processed and cloned accordingly.
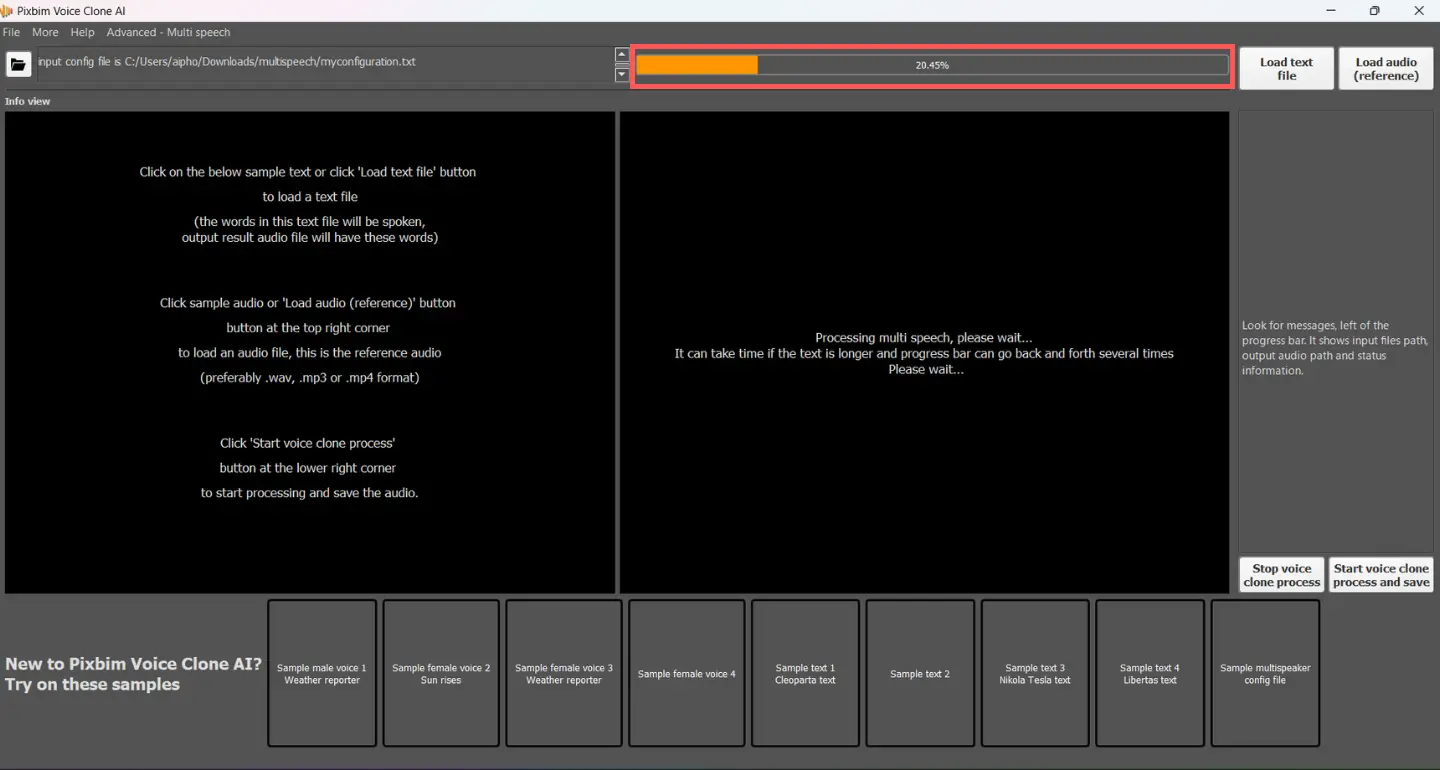
Step 4: Access the Multi-Speech Voice Clone Output
Wait until the progress bar shows 100% completion. Now you can see the progression bar in the screenshot below has been fully processed.
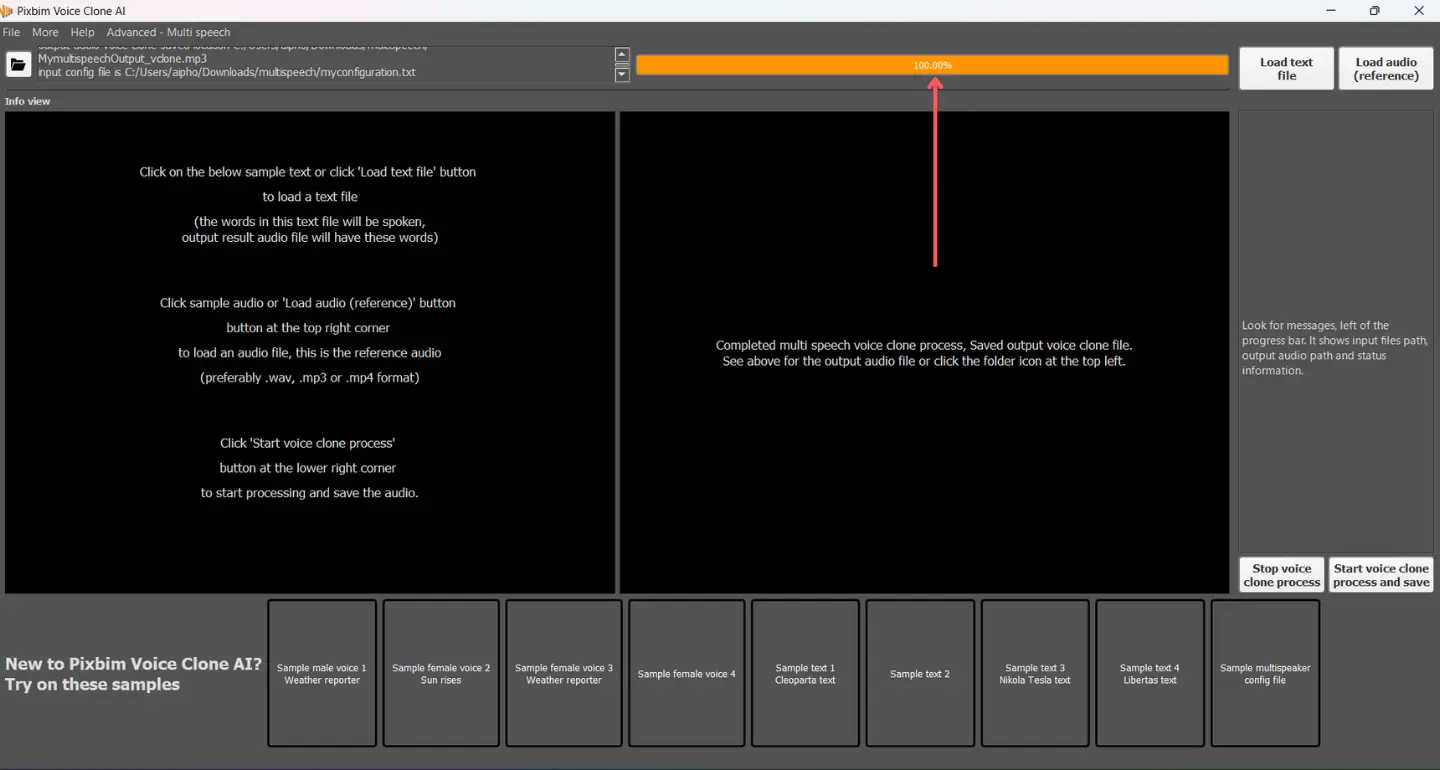
Once finished, your multi-speech voice cloned audio file will be ready, which saved in the specified location. You can directly access the output from the highlighted icon below in the screenshot.
![]()
How to organize Your Input Text for the Best Voice Cloning Results?
Pixbim Voice Clone AI supports very large text files (as an input) and unlimited characters. In fact, even extremely long scripts can be generated in a single run. However, for smoother performance, faster processing, and more stable output, proper text organization is highly recommended, especially for long narrations such as audiobooks or storytelling projects.
Many users are unaware that poorly structured text files can slow down processing or affect output quality or it might cause an error which will be frustrating. We have given best practices to help you achieve the most natural and efficient results.
Recommended Text Preparation/Organizing Guidelines
1. Divide Large Content into Sections - If your content includes multiple chapters (for example, an audiobook), split the text chapter by chapter instead of processing everything at once.
2. Break Large Chapters Further - If a single chapter is very long (for example, 25,000–30,000 characters or more), divide it into 2–3 smaller parts for optimal performance.
3. Maintain Proper Punctuation - Ensure punctuation such as commas, periods, and paragraph breaks are consistent and correct. This helps the AI generate more natural speech flow.
4. Remove Emojis and Special Characters - Avoid emojis, decorative symbols, or unnecessary special characters, as they may interrupt or confuse the AI model during generation.
5. Use Normal Sentence Case - Avoid fully capitalized sentences. Convert all text into normal sentence case for smoother voice synthesis.
6. Clean Formatting - Review line breaks, spacing, and paragraph structure to keep the text neat, readable, and well organized.
Why Smaller Sections Work Better?
1. It reduces system load.
2. Prevents memory overloading of your desktop/laptop.
3. Improves processing speed. A smaller section makes the laptop/desktop feel ease and improves the processing speed.
4. Enhances output stability and reliability.
5. Makes it easier to manage and combine outputs later.
This approach is especially effective for long-form narration, audiobooks, and professional voice-over projects.
Example Workflow (For audiobook narration)
1. Break the book into chapters
2. Further divide each chapter into smaller sub-sections (If you have very big chapters)
3. Generate voice output section by section
Finally, combine all generated audio files using any video or audio editor (for example, Canva or similar tools). This method ensures consistent quality, faster generation, and flawless results, even for very large projects.
What is Multi-Speech Voice Cloning?
Multi-speech voice cloning is an advanced feature in Pixbim Voice Clone AI that allows you to clone multiple distinct voices and assign them to different characters in a script. Instead of using just one cloned voice, this feature enables each speaker in your script to have their own unique voice, creating natural-sounding conversations. It's perfect for podcasts, storytelling, and audiobooks, bringing your content to life with realistic, AI-generated multi-voice interactions.
Now, imagine the characters in your story speaking their parts, instead of a single narrator reading everything. Children and listeners will love hearing their favorite characters come to life. Similarly, audiobook narration with multiple voices makes the listening experience more immersive and captivating.
The multi-speech voice cloning feature of Pixbim Voice Clone AI has a wide range of applications, from AI-generated podcasts and storytelling to audiobooks. This feature saves both time and cost. Voice cloning now reaches a new level you can effortlessly create conversations with different voices, without any manual edits.
Best Practices for Producing Natural Speech Outputs:
For best results, load a clear voice with minimal background noise. This allows the voice cloning software to generate the best results.
1. Avoid Abbreviations:
When drafting your script, use less of shorthand expressions. For instance, instead of saying, 'You're making this even better', opt for 'You are making this even better'.
2. Spell Out Numbers:
Write out numbers in full. For example, use 'Seventy-three' instead of '73'.
3. Divide Long Scripts:
If your script (text) is lengthy, such as a book with several chapters, consider breaking it down into several text files. This approach will help create smoother and better results in your voice cloning.
4. Use Proper Punctuation:
To achieve a better AI voice output, use appropriate punctuation marks, including commas, periods, and exclamation points.
Commas indicate pauses, while periods signal the end of a sentence. An exclamation means excitement or strong emotion. Thoughtful use of punctuation helps the AI in a more better listening experience.
With advanced speech analysis, Pixbim Voice Clone AI provides exceptional quality voice impersonation and replication for all of your audio projects and needs. The easy cloning process makes it easy for anyone to replicate voices in minutes.
Buy Pixbim Voice Clone AI $59 $79
Download Free Pixbim Voice Clone AI
More from Pixbim
